I’ve been having a sort through my stockpile of boards and components and found enough spare parts to assemble more of the Festive Fireplaces. As I didn’t document how to re-program the ATtiny25 in the original post, this post will guide you through how to upload a new program to your Festive Fireplace.
Two methods of programming the ATtiny25 are described below, either using an Arduino as an ISP or using a dedicated in-circuit programmer, in this case USBasp.
ArduinoISP
For the first batch of Festive Fireplaces I used my Arduino UNO as a programmer. The instructions below are based on this guide but tweaked for the Festive Fireplace.
Arduino IDE
First, connect the Arduino UNO to your computer.
In the Arduino IDE:
- Open the “ArduinoISP” sketch: “File > Examples > 11.ArduinoISP > ArduinoISP”.
- Click “Verify” and then “Upload” to program the sketch onto the Arduino UNO.
The Arduino IDE doesn’t natively support the ATtiny microcontrollers so we need to add support. In the Arduino IDE:
- Open the “Preferences” dialog: “File > Preferences”.
- Copy this link into the “Additional boards manager URLs” field.
- Click OK.
- Open the “Boards Manager”: “Tools > Board > Board Manager”.
- Type “attiny”.
- Click “Install”.
Now we have to set the Arduino IDE up to program the ATtiny25:
- “Tools > Programmer > Arduino as ISP”.
- “Tools > Board > attiny > ATtiny25/45/85”.
- “Tools > Clock > Internal 1 MHz”.
- “Tools > Processor > ATtiny25”.
Connecting the Arduino UNO
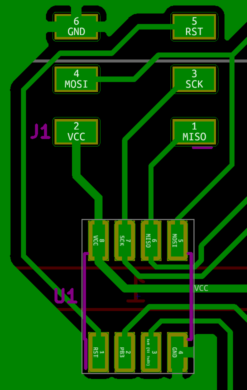
Connect the Arduino UNO to the Festive Fireplace programming header using jumper cables.
| Arduino Pin | Programming Header Pin |
| 5V | 2 |
| GND | 6 |
| 13 | 3 (SCK) |
| 12 | 1 (MISO) |
| 11 | 4 (MOSI) |
| 10 | 5 (RESET) |
Additionally, place a 10uF capacitor between the Arduino UNO “RESET” pin and a “GND” pin. With the cathode of the capacitor connected to “RESET”.
Programming the ATtiny25
Once you’ve double- and triple-checked your connections we need to burn the Bootloader to the microcontroller. In the Arduino IDE:
- “Tools > Burn Bootloader”.
Now we can upload sketches to the ATtiny25 as if it were an Arduino.
USBasp
For the second batch of Festive Fireplaces my Arduino UNO was being used elsewhere. As I was doing a restock of components, I picked up a cheap in-circuit programmer from AliExpress.
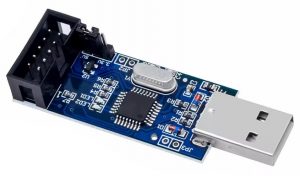
This is a clone of USBasp meaning there’s plenty of information available on how to use it, albeit some of it contradictory.
Information I found online suggested that you should use the Zadig application to replace the automatically installed drivers. I found that this wasn’t necessary and the automatically installed “libusbK (v3.1.0.0)” worked just fine with avrdude from the command line.
I haven’t managed to figure out how to use the Arduino IDE to do the programming, but it’s pretty simple to do from the command line.
The Arduino IDE doesn’t natively support the ATtiny microcontrollers so we need to add support. In the Arduino IDE:
- Open the “Preferences” dialog: “File > Preferences”.
- Copy this link into the “Additional boards manager URLs” field.
- Click OK.
- Open the “Boards Manager”: “Tools > Board > Board Manager”.
- Type “attiny”.
- Click “Install”.
Now we have to set the Arduino IDE up to compile for the ATtiny25:
- “Tools > Board > attiny > ATtiny25/45/85”.
- “Tools > Clock > Internal 1 MHz”.
- “Tools > Processor > ATtiny25”.
We’ll need the output file later. In the Arduino IDE:
- “Sketch > Show Sketch Folder“.
- Navigate to “build\attiny.avr.ATtinyX5” and you should find a file with suffix “.hex”.
Connecting the USBasp
Connect the USBasp to the Festive Fireplace programming header using the provided cable. VCC on the programming cable should align with label “J1” on the PCB.
Programming the ATtiny25
The avrdude program comes as part of the Arduino IDE. For me this was in “AppData\Local\Arduino15\packages\arduino\tools\avrdude\8.0.0-arduino1\bin”. You may instead choose to download the program separately. Open a command prompt in this location.
The following command will upload the “.hex” file to the ATtiny25:
avrdude.exe -c usbasp-clone -p t25 -P usb -B 4 -U flash:w:"<hex folder>\Fireplace.ino.hex" -vCode language: plaintext (plaintext)The “-B 4” is required to set the clock period otherwise avrdude tries to use a much too high clock frequency.
The output was as follows:
Avrdude version 8.3
Copyright see https://github.com/avrdudes/avrdude/blob/main/AUTHORS

User configuration file is not provided/readable

Using port            : usb
Using programmer      : usbasp-clone
Setting bit clk period: 4.0 us
AVR part              : ATtiny25
Programming modes     : SPM, ISP, HVSP, debugWIRE
Programmer type       : usbasp
Description           : Any usbasp clone with correct VID/PID
Set SCK frequency to 187500 Hz

AVR device initialized and ready to accept instructions
Device signature = 1E 91 08 (ATtiny25)
Auto-erasing chip as flash memory needs programming (-U flash:w:...)
specify the -D option to disable this feature
Set SCK frequency to 187500 Hz
Erased chip
Reading 1338 bytes for flash from input file Fireplace.ino.hex
in 1 section [0, 0x539]: 42 pages and 6 pad bytes
Writing 1338 bytes to flash
Writing | ################################################## | 100% 0.91 s
Reading | ################################################## | 100% 0.43 s
1338 bytes of flash verified

Avrdude done.  Thank you.Code language: plaintext (plaintext)
Some AliExpress reviews mentioned the firmware being out of date. I didn’t seem to run into any issues with it but I flashed the latest just to be safe. There are links detailing how to do that here and here.