After my first batch of Clamps badges sold out on Tindie, I was lamenting that I didn’t have any spare boards to put rainbow LEDs in. Jon Raymond suggested that I could go one step further and add an ATtiny85 and some RGB LEDs. Not one to turn down a challenge, I started work!
… or maybe an Attiny with a pair of 2mm APA102 RGB leds and a button? 🙂
— Jon Raymond (@Jon_Raymond_) April 27, 2018
A large amount of inspiration for this project came from davedarko’s Knightrider badge and having access to his schematic was a great starting point for this badge.
My initial plan was to simply connect two RGB LEDs such that both showed the same colour but I decided that I’d really like to have a few different animations that I could cycle through. The ATtiny has more than enough pins to allow charlieplexing of up to four RGB LEDs. Fortunately I saved myself the headache of trying to figure out the wiring by stumbling across this resource. However, trying to understand the code on that page ended up giving me a massive headache!
Thus began the process of laying out the board. Squeezing everything into such a small space on a single side of the board was a little tricky and I often went back to modify the schematic to make it easier to route connections. Here’s a GIF of the various revisions:
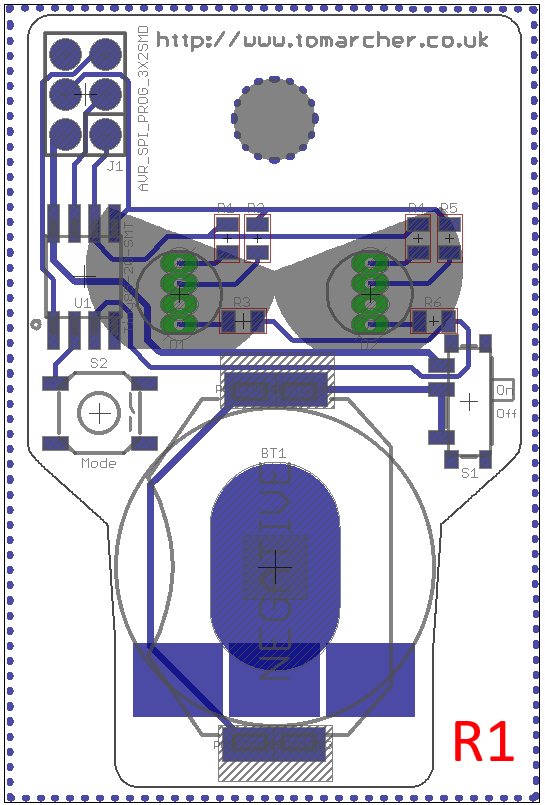
The first revision shows the original plan of having the two LEDs showing the same colour. From revision 2 onwards, I moved to the charliplexed layout and reduced the number of resistors by two. Subsequent revisions involved me adjusting the schematic to try and improve the layout of the traces. In revision 4 I realised that the switch was in the way of the battery holder so it was moved to the upper corner of the board. I also moved back to 1206 resistors from 0805 as I have a bunch of the former left over from the first run of the badges.
Here’s how the LEDs ended up being connected to the ATtiny85 in the end:
| ANODES | ||||||
|---|---|---|---|---|---|---|
| PINS | PB3 (PB3) | SCK (PB2) | MISO (PB1) | MOSI (PB0) | ||
| CATHODES | MOSI (PB0) | B1 | R1 | G1 | ||
| MISO (PB1) | B2 | R2 | G2 | |||
The idea behind charlieplexing is that each RGB LED is turned on in sequence with only one being on at any time. Do this quickly enough and it looks like both LEDs are illuminated simultaneously. Thus, the code will have to drive each cathode low in succession, and set the appropriate anodes high depending on the colour to be displayed. Using software-PWM it’s possible to alter the intensity of each R,G & B component of the colour.
Once I was happy I ordered a small prototype run from OSH Park who nicely upgraded the order to their Super Swift service for free! Naturally, the next day I noticed my power button labels were the wrong way around. This is why we do prototype runs!
Next I need to start work on the code and figure out how to flash the ATtiny85.
I’ll post an update once I’ve got the boards in hand.
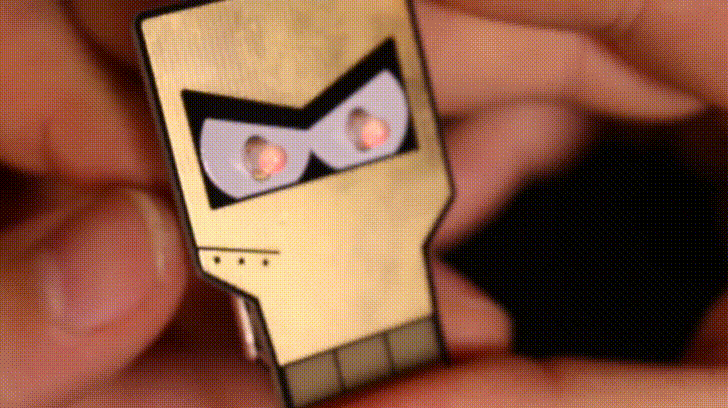
Meanwhile davedarko put rainbow LEDs in the badge I sent him, and they look great!